Saturday, October 6, 2012

Changing a brake Caliper in a 1997 Nissan Sentra

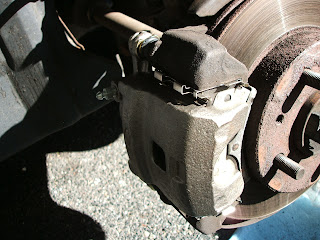
Last time I changed the pads in this car, I noticed some fluid leaking from the piston boot of the drivers side caliper.  It's nothing big.  We didn't even notice the depletion in the reservoir, but Leaking break fluid is no good.  Rebuilding a caliper looks like a pain, and they aren't that expensive, so I just bought a new one.

Here we go.  Jack up the car and take off the wheel.

Spray the whole thing in brake cleaner.

Make sure there is enough fluid in the reservoir.  Here is the prime directive:  Don't let the master cylinder run dry.  If I was qualified, I would have had someone watching the reservoir, constantly filling it.  If I was qualified, I would not have this blog.

Compress the cylinder with a C-clamp enough to get the caliper off.  Just like if you were changing pads.
This is where I thought I was smart.  I figured: Take the caliper off and hang it from the strut with a coat hanger, get the new one on, then move the hose from one to the other quickly to minimize the lost fluid.  This won't work.  You won't be able to put enough torque on the banjo bolt to loosen it unless its installed.  Unless you're He-Man.  If you are He-Man, please try it... Also, please post a comment.  I would like to know if He-Man reads my blog.

Anyway, the Haynes manual says to remove the banjo bolt and then use a spare piece of hose to plug the brake line.  It does not say what the hell size hose is required, so you cannot buy it.  As it is, I emptied a good deal of fluid onto the pavement.
This was a dumb idea
You can see the leaking fluid
Banjo bolt doesn't come off if
 you take the caliper off the car
If I was to do it again, and I still did not know the proper hose size, I would probably take the NEW caliper, hang it from the strut, take the banjo bolt off and move the line to the new caliper while it is hanging, and tighten it as much as I could.  Oh well.

The caliper I bought at AutoZone came with new pad glides, pin bolts, pins, and pin boots, so I replaced all that stuff too.

After the old caliper is off, pull the brake pads and old glides.  Put in new glides.


 Below, you can see the new hardware vs the old hardware.  Let me tell you how thankful I am that the boots on the Sentra aren't like the boots on the Corolla.  I had to replace those once.  They are glued to an aluminum ring which gets press fit into the caliper bracket.  Press fit!  I destroyed so many of those trying to press fit them... and no one carries them.  You have to order them.  My car was laid up for a week because I couldn't get pin boots.  Anyway.  the ones on the Sentra come right off.

 Now, you have to put a little grease on the pins before you put them in the bracket.  Make sure you get the boot over the appropriate rings, and then push the pins all the way in to eliminate any air.

Grease on the pin
Boot on the pin


Pins in the bracket
 I always put a little grease on the pads where they touch the glides because they would always bind on the corolla.  Probably not necessary and dear god, only use a little and don't get it on the pad surface or the rotor
 Put the caliper on and torque to the appropriate spec.
 If you haven't already moved the brake line, now would be the time.  Of note, when you buy your caliper, make sure you can locate the two copper washers that are the gasket on the banjo bolt.  Mine were on the plug that they had in the new caliper.  Do not lose these.  One washer goes between the bolt head and the brake line and the other goes between the brake line and the caliper.  Torque the banjo bolt to spec.


Finally, you need to bleed the brakes.  You need another person.  Here is my setup.

 There are lots of posts on how to bleed breaks.  It's pretty much the same in every car.  You need another person and they press on the brakes while you open the valve.  Don't let them come off the brake with the valve open, and don't let the reservoir run dry.

Even though this was pretty successful, I did dump a lot of brake fluid as I was messing with the line.  The breaks are a little mushy, but they have always been mushy.  I may just replace the Master cylinder for the sake of doing it.  But that is another post.


Thursday, September 20, 2012

Changing Brake shoes on a 1997 Sentra

I sold Blue Cyanide (sad) and got the wife a giant Mazda thing she won't let me drive.  That means I got the Sentra and the Sentra's brake shoes are groaning.

Brake shoes make you a man (or woman).  Unlike brake pads, which are a snap to change, changing brake shoes is all springs and hate.  But like most things on the car the first one is a total pain, then when you figure it out, the other side is a piece of cake.  I had been through this process on Blue Cyanide before, but each car has their own delicate balance of springs.  I'll spare you the details of the various curses uttered on the first one and get straight to the successful methods on the second one that you will want to recreate.

I used:
Screwdrivers (medium flathead, and small one for pushing ratchet mechanism)
Hammer
Small vice grips
Big Vice grips
Brake hold-down spring tool
Lots of brake cleaner
Haynes manual
New shoes
New spring kit
High Temp Grease

1.  Jack up the car and take the wheel off.  Remember: safety glasses, jack stands, wheel blocks.

2.  Take off the drum.  This is the trickiest part if you haven't done it before.  This is because you need to retract the brakes first, and you have to do it through a hole in the back, not having previously seen what is in there.  On both the Corolla and the Sentra you need to simultaneously move the ratchet mechanism and spin the star wheel.  (Th screwdriver through the back should spin it "up.") However, where the Corolla had a slot for the screwdriver to go in and lever the mechanism out of the way, on the Sentra, you just push it.  Hopefully this picture of the screwdriver pushing the mechanism off the star wheel will help you visualize what you are trying to do.


3.  After you get the brakes retracted, you may still not be able to get the drum off because it is rusted on.  Look for two threaded holes on the drum.  If you have them, put two bolts in them and turn until the drum comes off.  If you don't have the holes, you are stuck and you need to go rent/buy a drum puller.

After you get the drum off, it looks like this:

4.  Wash everything down with Brake Cleaner.  Don't breathe the cleaner or the dust.

5. Now you can start to remove pieces.  Start with the main spring.  This is the most straightforward.  I just grabbed it with a small vice grips and pulled it out of its hole.  It actually wasn't too bad.
 6.  Now you can remove the brake hold-down springs on either side of the hub using the unitasker we bought for the purpose.  The fit is tight around the hub, but I found I could slip it in the bottom and work it up to the spring.  You just push on the thing and turn it a quarter turn, but you may have to hold the pin from the back and wiggle it a lot.  You should get it.
7.  Consider the situation.  This is where I started swearing on the first wheel, because I couldn't figure out how to get the damn springs off.  The Haynes manual says something unhelpful like "remove the shoes as an assembly."  Fortunately, I am here to tell you how to get the stupid things off.  First, back off the star wheel so there is no extra tension in the spring.  Then look at the bottom of the assembly.  There is kind of a block that both the shoes ride on.  The key to this is using that block for leverage against the bottom spring.  Take your bigger screwdriver and jam it straight up between the block and one of the shoes.  

Pull the shoe off the block so that it slides in front of it.  This should take the tension out of the bottom spring.  Pull that spring out and the rest of the assembly should fall free, though you may have to pull out the top adjuster spring.
8.  The last piece that's still attached is the parking brake.  You just need to slide back the spring and take it off.  This is easy on the Sentra.

9.  You have it apart.  Good job.  Now, we are at the annoying part.  You are replacing the shoes, but you aren't replacing all the parts.  One of the parts you aren't replacing is the parking brake arm.  So you have to get it off the shoe.  It's held on by the most annoying method possible.  The C-washer.  

Before you get to taking it off, note where it's held on and on which shoe.  You are going to need to attach it to the new shoe and if you attach it to the wrong shoe or the wrong post, you won't get a second chance because of the < expletive > C-washer.

Anyway, after you've noted its attachment point, set the shoe on the ground and grab your hammer and screwdriver.  Put the screwdriver at the opening of the C-washer and pound on it with the hammer until it begins to open.  Then pry, twist, and generally manhandle the C-washer off.  You can't use it again, so don't worry about ruining it.

WORD OF WARNING:  I used the spring kit from Autozone.  This will give you C-Washers and other parts you will replace.  However, the washers they give you to go under the C-washers are really thick lock washers.  I have no idea how you are supposed to get that thing on with those washers.  SO, if you have this kit, you need to be careful when you remove the old C-washer.  You can damage the C-washer all you want, but try to keep the washer underneath in tact.  When you get it apart, compare its thickness to the one in the kit and shake your head.
10.  Now you have everything apart.  Take a moment to sort the hardware you need to keep from that you are replacing.  Everything you are replacing should be in your spring kit.  Take the stuff you are keeping and give it another wash with your brake cleaner.
Keep these.
Throw these away (recycle them)
11.  We can now start putting everything back together in reverse.  Use the old flat washer and the new C-washer from the kit to attach the parking brake lever.  This Autozone kit has a C-washer with no little nubs to get a grip, but I was able to close it anyway with a big vice grips.
Open
Closed
12. Sand, brush or just wipe down the points where the shoes make contact, and put a little high temp grease on those points.  Just a little though.  You don't want to grease the brakes.

13.  Reattach the parking brake, rotate the trailing shoe into position and use the new hold-down spring to ... hold it down.


14.  Now things get difficult again, and the manuals say stupid stuff like "attach the spring."  Here's how to do it easily. Take the adjuster spring and attach it to both shoes.  It goes through a hole on the trailing shoe and a post on the leading shoe.  (Make sure it attaches around the back of the trailing shoe.) 

15.  Maneuver the leading shoe into position at the top, but don't bother trying to get the bottom into position.  Leave it in front of the block at the bottom.  It should be loose enough that you can attach the bottom spring without too much trouble.

16. Now take your screwdriver and jam it between the block and the shoe, but this time, jam it in the front, above the spring.  Leverage the shoe into position, let it ride down the screwdriver and onto the block where it belongs.  This is by far the easiest way to do this.  The spring goes below the block, so if it is not there at the end of this operation, push it there.  Then you can attach the other hold down spring.

Sorry this picture stinks
 17.  Slip the self adjuster into place.  Sorry I don't have a trick.  You just need to screw it as small as it goes and manhandle (or womanhandle) it into place.
 18.  Attach the self adjuster ratchet mechanism.
 19.  The return spring is the last hard part.  Hook it into place on the ratchet mechanism.  Then, hook it on the screwdriver.  Stick the end of the screwdriver over the post you ar trying to get on.  Use the leverage to stretch the spring, and let it ride down the screwdriver onto the post. 

20.  All Right!  We got it all back together.
21.  Now what you need to do is move the star wheel to expand the brake shoes until the drum drags a little then back off. a little.  You can expand them a bit with the drum off, then you need to put the drum on, expand them a little more. Step on the brakes pedal a few times to center the shoes.  NEVER STEP ON THE PEDAL WITH THE DRUMS OFF!  Then you can adjust the rest of the way with the 


22. Do the other one.

23.  Turn on the car and try the pedal.  If it goes straight to the floor, your shoes are too far away from the drum.  Get out and adjust the star wheel again.  If it seems ok, put the wheels pack on and take a careful spin around the block.  Operate the hand brake a few times to advance the adjuster to the correct position.  I always go in reverse and stop the car with the hand brake a few times, though I am not sure this is strictly necessary.  It may be a leftover practice from another age.

24.  That's it.  You're done.  Celebrate!

Sunday, July 8, 2012

In which I clean up my mess

As you know, spilled a bunch of oil in the asphalt parking lot of my apartment building last post.

Trying to be a good neighbor and tenant, I attempted to clean it up using some remedies I found online.  First I covered it in kitty litter, rubbed it in and then swept it up.  Unfortunately, it seems that the recommended kitty litter is the clay kind and I only had silica crystals.  Still, they seemed to do their job.  The liquid oil is mostly gone, and the smaller crystals turned brown, so I was just left with a stain.

Next, the internet said to scrub it with detergent.  Once again, I failed to have the prescribed type.  They call for powder, and I had liquid.  I poured it on, scrubbed with a brush, let it sit, and rinsed it away.  Unfortunately, this did not work so well, and the parking lot is still stained.  I suspect it will go away with time, as the asphalt will absorb the oil, but I may try the powdered detergent at a later date.

Dishsoap was also great at removing oil from me, so that may also be worth a shot.

UPDATE:  The powdered detergent actually did a pretty good job.  You need A LOT of water  to rinse it away though, so make sure you have a hose or rain on the the way.  I don't recommend schlepping a tiny wastebasket from your kitchen like I did.

In which I work on my transmission and make an absolute mess

My car is a 2001 Toyota Corolla (stick shift) which I bought from a lady in my neighborhood with 120k on it.  It currently has 150k on it.  I call it Blue Cyanide because it is blue and it has CN in the license plate.  I don't know about you, but I cannot see CN without thinking of cyanide.

Blue Cyanide makes noise and has some things wrong with it.
It rattles in the front because the heat shield is loose
It clunks in the back for a reason that I have not been able to identify
The check engine light goes on periodically because the canister vent valve is broken.

It has spent it's life in New England without a garage and consequently is totally rusted out and a total bitch to work on.  I am not going to fix these things because they don't matter and are expensive and/or difficult.

Recently, it has been making a new noise.  The transmission (transaxle) kind of makes a reving noise when it is in 3-5th gear.  I know it is the transmission because, (a) it comes from that location (b) it only happens in gear, clutch engaged, and (c) if you take your foot off the gas, it stops for a second while the transmission goes from pushing the wheels to being pushed by them, and then begins again.

If you look in the Haynes manual, all of the things that cause transmission noise are marked with a "don't try this at home" star.  Except: Low fluid.  The tranny is nocibly covered in oily grime, so I thought it might be leaking. So I decided to try to top it off.

Tools needed:
24mm Socket
Funnel with hose
API GL5 75W90 gear oil
Socket wrench and cheater bar
Jack and jack stands
Liquid Wrench or other penetrant

WHAT HAPPENED

Now, I think my first step is where I made my mistake.  I jacked up the car.  Don't jack up the car.  Or if you do do this either: Jack up all four corners, or jack it up at a strategically relevant time (See below).

Manual transmission fluid is filled through a fill hole on the front of the transmission, which is way down where the axle is.  There is no dip stick.  You are supposed to take out the bolt, stick your finger in to check it, and add oil till it comes spilling out the hole.  Because of this, the car should be level when you do it <sigh>.

I figured that because the fill hole was in the front, it would be reasonable to jack up the front of the car while I removed the bolt, because the oil would sit in the back of the trans.  Then I could lower it to check the level.  This would probably be fine if I had jacked up both sides, but I only jacked up the left side, because that was where the trans is and I could get to the bolts from there.

I loosened the bolt with the 24mm socket and a cheater bar from the top.   This was my first surprise.  It turns out, because of some plastic cowling on the bottom of the car, you are way better off doing everything with the fill hole from the top of the engine, fishing your arms around the battery and other components.  This obviates the need to jack the car.

Of course, I did not know this, so after I loosened the bolt from the top, I climbed under the car to remove it.  At this point, I was covered by the oil flowing out the fill hole and onto the parking lot.  Yuck.  If it wasn't low on oil before, it was now.  I sopped up the oil that I could, lowered the car, and figured out how to replace the oil I had lost.

AutoZone sells a gray "transmission funnel" with a hose attachment for this purpose.  The hose is not really long enough, but it will work.  Jam the funnel itself between the battery and the intake hose, and then fish the tube into the fill hole in the trans.  The extra inches from jamming in the funnel is all you need.  Then I poured in some oil until it started to dribble out.

This is where I get unsure.  I only added about half a quart of oil.  It certainly seemed to have gushed more than that, but of course it seems like a lot when it is all over your arm.  There it was, dribbling out the fill hole like it was supposed to though.  When I stuck in my pinky (the only finger that would fit), I couldn't feel the oil surface, but it came out covered in oil.  Same with the screwdriver I stuck in.  So I put the bolt back in and tried to clean the parking lot.

RESULTS

When I first drove the car, the noise was gone.  But I had just filled it, so there was probably oil all over everything.  When I drove it the next day, the noise was back.  The next thing to try was a full oil change, so I drove to autozone to get more gear oil.  However, on the way home from autozone, no more noise.

I will drive it this week, and if the noise is back, I'll change the oil next weekend.  The drain hole is a bit caked over, so I don't want to try to take it out if I don't have to.

NEXT TIME

Here is the plan for next time:

1. Loosen, but do not remove fill plug (It is important to make sure you can remove fill plug before removing drain plug.
2. Jack up front left side of car.
3. Remove drain plug with oil pan underneath.
4. Lower car
5. Remove fill plug
6. Allow oil to drain
7. Jack up front left side of car
8. Replace drain plug
9. Lower car
10. Using funnel and tube, add three quarts of oil.  The trans should hold 2.7quarts, and the excess should come out, so there should be no question about how full it is.
11. Replace fill plug

Sunday, March 25, 2012

In which I build a bed: Part 3

Man's second best friend.
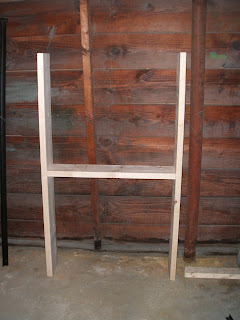
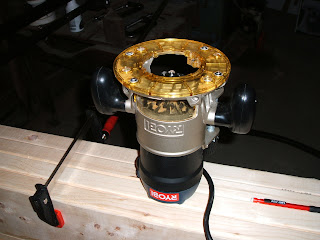
Ok, now that we have the two steel L-Pieces from the old bed, it's time to build the structural support.  Because we have a split box spring, we need to make sure we are supporting the middle as well as the sides I elected to accomplish this by building two Hs out of 2x8s and bolting the L-pieces to the top. 2x8s are the perfect width to make an bed of appropriate height.  However, we also need to make sure we are supporting them at relatively the same height.  So out comes my second favorite power tool, the router.  Being cheap, I have the bare bones (read: not plunge) router, not that it stops me from plunging it.


 The idea is to rout the end of the 2x8 so that is just fits the angle steel.  We rout it down by the thickness of the steel so the top of the steel is flush with the top of the wood (about 1/8").

Don't do it this way
Nicely routed
Countersunk Lag Bolts
I started by clamping all four pieces of wood together and screwing in a scrap piece as a router guide.  The scrap piece was a good idea, but there was so much variation in the width of the 2x8s the router cuts were a mess.  A little experimentation showed I could do about 2 at once.  I only needed to cut 8, so that was fine.

A Finished H
The routed pieces would form the legs of the Hs, and two more 2x8s would make the cross pieces.  Because I was bolting these together and the H's would need to lie flush up against each other, I used by non plunge router as a plunge router and countersunk the bolts on that side.  The other sides I didn't bother countersinking.  The whole thing bolted together to make 2 H's.  Having two H's instead of one big structure will also make it easier to move than one big structure that doesn't come apart.

The steel pieces were also attached to the frame via lag bolts, albeit smaller ones, and I had to drill new holes in the steel for them.  The wooden frame couldn't attach where the old cross pieces attached because we needed room for those plastic bins.I bought a nice metal drill bit and some cutting oil for this to make it easier.  


Of note, Home Depot or Lowes might tell you they don't have cutting oil, but they do.  They just don't keep it in the tools sections so the tools guys don't know about it.  It is in the plumbing section and labeled "thread cutting oil."  Get some, your metal bits and blades will thank you.


For those who are paying attention, you will note that I went to all the trouble of routing the 2x8s to accommodate the thickness of the metal, but then bolted it on with the bolts rising higher than the top of the metal.  Good catch.  I am figuring though, since the rivets on the old bed rose up only slightly less than the bolts do, we are probably ok.  The bolts plus the metal thickness might be too much though.


So that's it, drill some holes, bolt it together, bolt the headboard on and I've got a new bed!  The bed skirt covers it completely, the plastic bins fit, and there is no more motion transfer.  My wife and I can sleep in the same bed again without the threat of impassioned homicide.  Not bad for an unqualified guy.
The finished product.
Have fun trying it on your own.

Qualified Schmalified,
TRW

Saturday, March 24, 2012

In which I build a bed: Part 2

Let's start!

The first thing we need to do is take apart the old bed.  The bed consists of assemblies each consisting of 3 L bars of steel connected at a pivot point.  We only want the long side bars, not the ones with the legs.  In the image, the top one is still assembled while the bottom, I have taken apart.
The arm pieces are held onto the side pieces by what I am going to call a rivet.  Someone more qualified will probably have a better name, but it is obvious that it was put through a hole and then something was done to it on the other side so it couldn't pull out.  If that's not a rivet, I don't know what is.  The two pictures show the two sides of the rivet.  The left one shows the head, the right one shows the side where it was molded or something to make it stay.  Why am I talking so much about these rivets?  Because they are the devil.

Hacked through the rivet and it wont come apart!
 Unqualified as I am, I figure all I have to do is saw off the tail end of the rivet and the whole thing will fall right apart.  So I went out and bought a hacksaw...  and I hacked... and I hacked... I hacked.  And eventually, the tail fell off the rivet. Yay!  And the thing held together like I hadn't done anything.  Boo!

With that first one, I tried a couple more things, more hacking, drilling, pounding.  A lot of energy and a broken drill bit later, I had removed the rivet and got it apart. I couldn't afford to keep ruining bits, so I started searching for a new solution.

I bought a reciprocating saw.  I have wanted a reciprocating saw for the last 15 years, and I never had the excuse to drop $70-100 on one... even if it is the only saw you hold like an AK47.  Now I needed one, and Lowes had one for 30 bucks.  Let me repeat that. Lowes has a reciprocating saw for $30.  Go buy one now!

Man's best friend
As awesome as the reciprocating saw is (and it really is awesome), it really didn't help much.  It let me cut trough rivets much faster than the hacksaw, but I still could not get the bed apart easily.  Until I figured out the trick.  You only need to get the arm off, not the whole rivet.  This is where you should pay attention if you are taking apart one of these steel framed beds.

How to get a bed frame apart:
1. Saw off the end of the rivet with a reciprocating saw or a hacksaw
2. Fold up the arm so it is parallel with the side piece you want to keep (This is part I was missing)
3. Grasp the end of the arm for maximum leverage and pull it straight from the side piece.  Do not rotate around the axis of the rivet.  Apply a firm constant pressure and it will come right off.
4.  Cut off the remaining nub of the rivet with hacksaw of reciprocating saw.
5.  Emery cloth until smooth
The nub.  And Victory!

It's amazing how easy it is if you know how.... and now you do.

Next up we will build the wooden frame of the bed.