Sunday, March 25, 2012

In which I build a bed: Part 3

Man's second best friend.
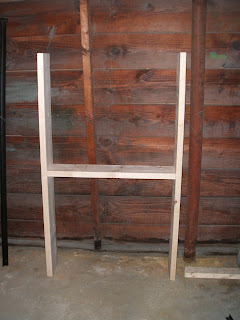
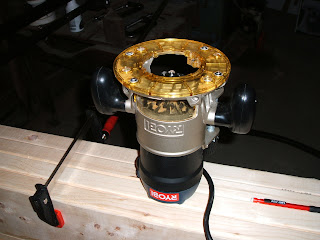
Ok, now that we have the two steel L-Pieces from the old bed, it's time to build the structural support.  Because we have a split box spring, we need to make sure we are supporting the middle as well as the sides I elected to accomplish this by building two Hs out of 2x8s and bolting the L-pieces to the top. 2x8s are the perfect width to make an bed of appropriate height.  However, we also need to make sure we are supporting them at relatively the same height.  So out comes my second favorite power tool, the router.  Being cheap, I have the bare bones (read: not plunge) router, not that it stops me from plunging it.


 The idea is to rout the end of the 2x8 so that is just fits the angle steel.  We rout it down by the thickness of the steel so the top of the steel is flush with the top of the wood (about 1/8").

Don't do it this way
Nicely routed
Countersunk Lag Bolts
I started by clamping all four pieces of wood together and screwing in a scrap piece as a router guide.  The scrap piece was a good idea, but there was so much variation in the width of the 2x8s the router cuts were a mess.  A little experimentation showed I could do about 2 at once.  I only needed to cut 8, so that was fine.

A Finished H
The routed pieces would form the legs of the Hs, and two more 2x8s would make the cross pieces.  Because I was bolting these together and the H's would need to lie flush up against each other, I used by non plunge router as a plunge router and countersunk the bolts on that side.  The other sides I didn't bother countersinking.  The whole thing bolted together to make 2 H's.  Having two H's instead of one big structure will also make it easier to move than one big structure that doesn't come apart.

The steel pieces were also attached to the frame via lag bolts, albeit smaller ones, and I had to drill new holes in the steel for them.  The wooden frame couldn't attach where the old cross pieces attached because we needed room for those plastic bins.I bought a nice metal drill bit and some cutting oil for this to make it easier.  


Of note, Home Depot or Lowes might tell you they don't have cutting oil, but they do.  They just don't keep it in the tools sections so the tools guys don't know about it.  It is in the plumbing section and labeled "thread cutting oil."  Get some, your metal bits and blades will thank you.


For those who are paying attention, you will note that I went to all the trouble of routing the 2x8s to accommodate the thickness of the metal, but then bolted it on with the bolts rising higher than the top of the metal.  Good catch.  I am figuring though, since the rivets on the old bed rose up only slightly less than the bolts do, we are probably ok.  The bolts plus the metal thickness might be too much though.


So that's it, drill some holes, bolt it together, bolt the headboard on and I've got a new bed!  The bed skirt covers it completely, the plastic bins fit, and there is no more motion transfer.  My wife and I can sleep in the same bed again without the threat of impassioned homicide.  Not bad for an unqualified guy.
The finished product.
Have fun trying it on your own.

Qualified Schmalified,
TRW

Saturday, March 24, 2012

In which I build a bed: Part 2

Let's start!

The first thing we need to do is take apart the old bed.  The bed consists of assemblies each consisting of 3 L bars of steel connected at a pivot point.  We only want the long side bars, not the ones with the legs.  In the image, the top one is still assembled while the bottom, I have taken apart.
The arm pieces are held onto the side pieces by what I am going to call a rivet.  Someone more qualified will probably have a better name, but it is obvious that it was put through a hole and then something was done to it on the other side so it couldn't pull out.  If that's not a rivet, I don't know what is.  The two pictures show the two sides of the rivet.  The left one shows the head, the right one shows the side where it was molded or something to make it stay.  Why am I talking so much about these rivets?  Because they are the devil.

Hacked through the rivet and it wont come apart!
 Unqualified as I am, I figure all I have to do is saw off the tail end of the rivet and the whole thing will fall right apart.  So I went out and bought a hacksaw...  and I hacked... and I hacked... I hacked.  And eventually, the tail fell off the rivet. Yay!  And the thing held together like I hadn't done anything.  Boo!

With that first one, I tried a couple more things, more hacking, drilling, pounding.  A lot of energy and a broken drill bit later, I had removed the rivet and got it apart. I couldn't afford to keep ruining bits, so I started searching for a new solution.

I bought a reciprocating saw.  I have wanted a reciprocating saw for the last 15 years, and I never had the excuse to drop $70-100 on one... even if it is the only saw you hold like an AK47.  Now I needed one, and Lowes had one for 30 bucks.  Let me repeat that. Lowes has a reciprocating saw for $30.  Go buy one now!

Man's best friend
As awesome as the reciprocating saw is (and it really is awesome), it really didn't help much.  It let me cut trough rivets much faster than the hacksaw, but I still could not get the bed apart easily.  Until I figured out the trick.  You only need to get the arm off, not the whole rivet.  This is where you should pay attention if you are taking apart one of these steel framed beds.

How to get a bed frame apart:
1. Saw off the end of the rivet with a reciprocating saw or a hacksaw
2. Fold up the arm so it is parallel with the side piece you want to keep (This is part I was missing)
3. Grasp the end of the arm for maximum leverage and pull it straight from the side piece.  Do not rotate around the axis of the rivet.  Apply a firm constant pressure and it will come right off.
4.  Cut off the remaining nub of the rivet with hacksaw of reciprocating saw.
5.  Emery cloth until smooth
The nub.  And Victory!

It's amazing how easy it is if you know how.... and now you do.

Next up we will build the wooden frame of the bed.

In which I build a bed: Part 1

So, I am a restless sleeper.  Evidently, I spend the whole night kicking the crap out of the bed for wrongs it never committed.  The Wife is a poor sleeper, which means every time I kick, she wakes up, and this is bad for everyone.   Let me just say that we spend a lot of time sleeping on the couch.

We knew this, so when we moved in together, we spent a great deal of time searching for a mattress that minimized what those in the mattress industry call "motion transfer."  We settled on a Naturally Bob's bed from Bob's Discount furniture.  Despite this, I continue to kick, she continues to be sleep deprived, and we both continue to be miserable.  Did Bob swindle us?

One day when we were particularly fed up, I decided to pay attention to the motion.  I realized that the motion that was being transfers wasn't an undulating vertical wave through the mattress, the bed was moving horizontally, head to toe.  If you look at the legs, on the bed frame, you can see that the support is much less stiff head to toe practically forming a flexure joint.

Experiment:  Lift up mattress, Box Spring, remove bed frame, put boxspring on floor. => Success!  No more motion transfer!  It's not Bob's fault!

The problem is, of course, the wife doesn't like the bed eight inches lower than it is supposed to be so we need a new solution.  We wanted to stay away from metal bed frames so we wouldn't have the same problem, but the platform beds we found were expensive and generally didn't have under bed space.  And thus, old, unqualified me started postulating how to build a bed.

Requirements:
1.  Queen size with split box spring
2.  No motion transfer
3.  Not visible under bedskirt
4.  Underbed storage for the plastic containers we use
5.  Able to attach our current headboard

I started thinking about platform beds, but plywood is so expensive and difficult to work with if you don't have a panel saw.  Plus, I thought it would bow under the weight if I didn't reinforce it along the edge (which would eliminate under-bed space)  Then I realized, only the legs are bad on this metal frame.  Maybe I could use pieces of it as the edge and build the actual support structure out of wood.  As a bonus we could use the same headboard attachment points as the old bed, since they would still be intact.

And now an unqualified plan is forming.  We start in the next post.